Dont Get Overcharged: Know the True Roof Leak Repair Cost
FRS Roofing + Gutters
Don’t Get Overcharged: Know the True Roof Leak Repair Cost
Roof leaks!
No one wants them, but most homeowners face them at some point.
That little stain on the ceiling? It’s often the first warning sign of something much bigger (and pricier) if you don’t act quickly.
But here’s the catch: many people either shrug it off or end up paying way too much for something that could’ve been fixed easily.
At FRS, we’ve seen this story unfold far too often.
Families come to us after being misled, misinformed, or charged unfairly for basic repairs.
That’s why we put this guide together to walk you through:
- What really causes roof leaks
- How small installation mistakes can lead to major issues
- What fair roof leak repair cost looks like
- How to catch problems early before they spiral.
Our goal? Help you feel confident, not confused, when it comes to your roof.
Why Is My Roof Leaking?
There are many reasons why roofs leak. Here are four of the most common reasons homeowners face, and why they matter:
1. Storm Damage
Heavy rain, hail, and powerful winds can:
- Remove shingles
- Buckle flashing
- Cog or pull gutters free
- Loosen roof vents.
This can leave your roof vulnerable to widespread water damage.
Even a single cracked or lost shingle from a storm can offer an entry for water to come through to the underlayment and destroy your roof.
2. Ice or Snow Piles
Snow that piles up over time can create ice dams. Big ridges of compressed water that fill up drainage and push melting snow under the roof shingles. This hidden water leak generally goes undetected until you see stains, drips, or sagging ceilings in your home.
3. Roof Age and Material Deterioration
The average asphalt shingle roof lasts 20 to 25 years. Beyond this, the material becomes weak, cracks easily, and sheds its waterproof granules. Old roofs also tend to be more likely to experience UV deterioration, algae, and flashing failure, each of which results in a leak.
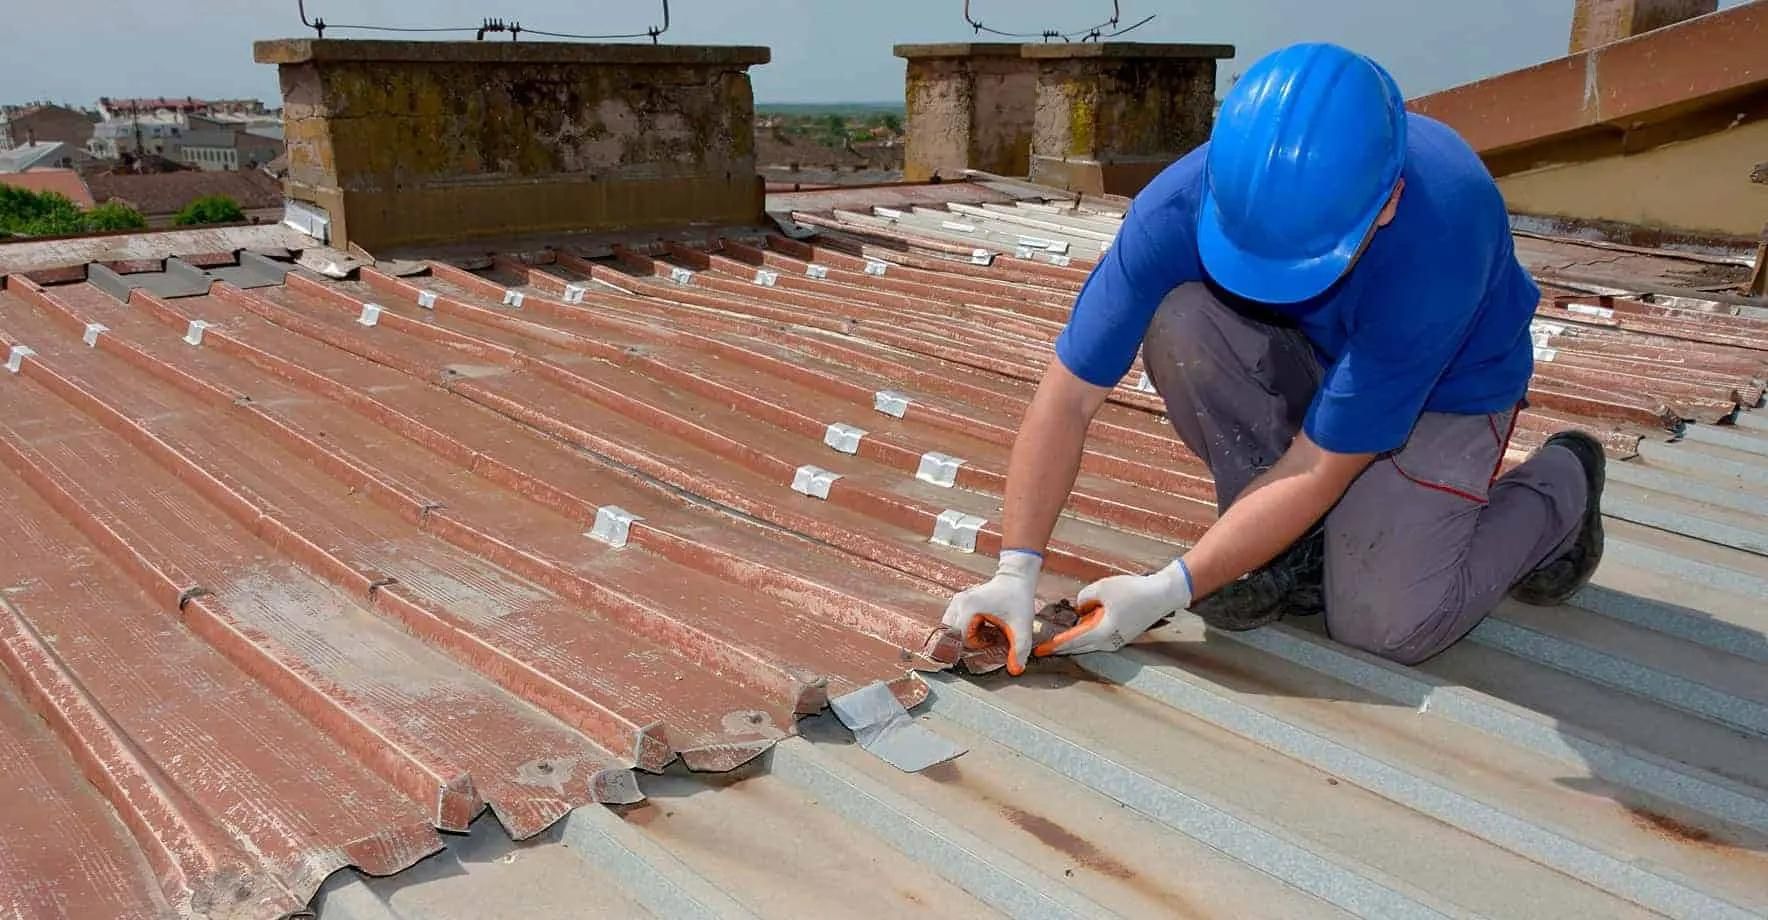
4. Improper Installation or Repairs
Flashless, ventless, and overlapping shingle alignment-free installation of roofs welcomes ultimate failure. Even though all may look fine at a glance. Poorly installed roofs typically nullify manufacturer warranties and also lead to costly repairs much earlier than anticipated.
How Improper Installation Affects Roof Leaks
Substandard roof installation is the main reason for repeated leaks despite high-end finishes.
A roof is more than shingles; each component needs to be installed correctly and by best standards.
Below are the most common mistakes in the field and how they cause water damage:
1. Shingle Malalignment
When shingles are not properly installed, they leave small but apparent gaps that compromise the roof’s capacity for water to flow off when it rains or during stormy winds. Misalignment also becomes more difficult to withstand wind and displays the nail line, which makes shingles easier to dislodge during storms.
2. Inadequacy of Sealing Around Holes
Skylights, vents, chimneys, and plumbing stacks should be sealed tight so that there are no leaks. That is equivalent to leaving the front door open on a stormy day! A small gap in such locations invites water inside and gets the underlayment, insulation, and interior drywall wet eventually.
3. Leaky or Clogged Gutters
Even though they are part of your drainage system, clogged or improperly installed gutters channel water towards the edge of the roof instead of away from your home. This constant spillover clogs fascia boards and seeps under shingles, typically rotting wood and leading to mold growth within the walls.
4. Improper Flashing Configuration
Flashing metal strips that go over roof edges, valleys, chimneys, and skylights must be installed with accurate angles and overlap. Anything else is inviting disaster. Defective or poorly installed flashing is one of the principal causes of roof leaks, generally inappropriately attributed to material failure.
5. Ventilation Problems
A roof that has been properly installed will need room for the attic to “breathe.” Without ventilation, heat and moisture will build up and ruin your roof from the inside out. This creates buckled decking, mold and mildew, and loose fasteners, which all make a big hole for leaks and structural damage.
6. Caulk or Sealant Spaces
Sealants dry out and become brittle with age. If not used properly in the first place, they degrade more quickly and permit water intrusion before anyone realizes it. Sealing and checking susceptible areas like flashing and vents regularly can save damage for decades.
7. Not Reading the Manufacturer’s Instructions
Each kind of roofing material, such as asphalt shingles, metal panels, or artificial systems, comes with particular instructions for installation. Failing to meet those standards not only lowers the lifespan of the roof but also voids any product warranty, and you would need to pay for the repair yourself.
5 Signs Your Roof Was Installed Improperly
Flimsy roof installations aren’t just cosmetic; they may lead to leaks, structural issues, and expensive repairs in the future.
It’s worth addressing these warning signs before it’s too late.
Here’s what to watch for:
1. Inaccurate Alignment
Uneven shingle lines are a big red flag. Roofers who fail to use chalk lines or who fail to set shingles in line have gaps and overlaps which ruin the waterproof seal.
Not only is this ugly, but it also lets rain blown by the wind underneath the shingles. This can lead to latent moisture damage further down the line in the ceiling or attic.
2. Gaps in the Roof
Outdoor seams between roofing materials, particularly where there are flashing, vents, or chimneys meeting shingles, indicate that the job was rushed or haphazardly.
These openings provide a path for water intrusion and a route for insects or rodents to travel through your attic. A properly installed roof will be even, and no underlayment can be seen.
3. Ceiling or Attic Wall Marks
When you observe yellow or brown staining in your home, especially along the ceiling or attic, it means water is leaking inside.
These stains usually result from leaks that are caused by improper installation, like nonexistent flashing points or inadequately sealed vents. When you fail to treat this moisture, it can result in mold, wet drywall, and even cause the ceiling to collapse.
4. No Symmetry in Shingle or Tile Patterns
Your roof must be even and level side to side. When tiles or shingles are unevenly stacked, spaced randomly, or cut poorly around valleys and ridges, it indicates sloppy work.
Unevenness typically is the result of carelessness or inexperience and typically indicates that crucial layers (such as underlayment or starter strips) were also compromised.
5. Holes or Nail Pops
Loose nails, exposed fasteners, or tiny patch holes are huge issues. They allow water in with every rain shower and weaken your roof over time. Nail pops are an indication that nails weren’t installed deep enough or in the correct location, which lifts and curls shingles. This compromises your roof’s wind resistance and voids most warranties.
Real-Life Story: How FRS Solved a Persistent Chimney Leak in Naperville
On a rainy November morning in Naperville, a homeowner reached out to us, frustrated and soaked.
She had already paid another contractor to fix a leak near her chimney, not once, but twice.
Each time it rained, the same brown stain would reappear on her living room ceiling.
When our FRS team arrived, we didn’t just patch over the problem. We investigated thoroughly.
Climbing into the attic, peeling back layers, and checking every corner of the flashing.
What we found was clear: the previous installer had cut corners.
The flashing around the chimney was improperly sealed, and the insulation below was heavy with moisture.
We got to work.
Our crew carefully removed the damaged shingles and saturated insulation.
Then, we reinstalled high-quality step flashing, secured it to building code, and reinforced the surrounding structure to ensure long-term protection.
Two years later, through thunderstorms, spring showers, and Chicago winters, not a single drop has made it through.
The homeowner still calls it her “FRS ceiling”, a little nickname for the peace of mind we gave her.
Why Most Roofers Leave Homeowners in the Dark
Many contractors focus solely on sales!
Skipping proper diagnostics, rushing quotes, and pressuring decisions.
They often fail to explain why leaks happen or what options exist.
At FRS, we believe homeowners deserve clarity.
That’s why we offer
- Free, no-obligation inspections
- Detailed explanations of any issues we find
- Upfront roof leak repair cost
So you can make informed decisions on your timeline, without the sales pitch.
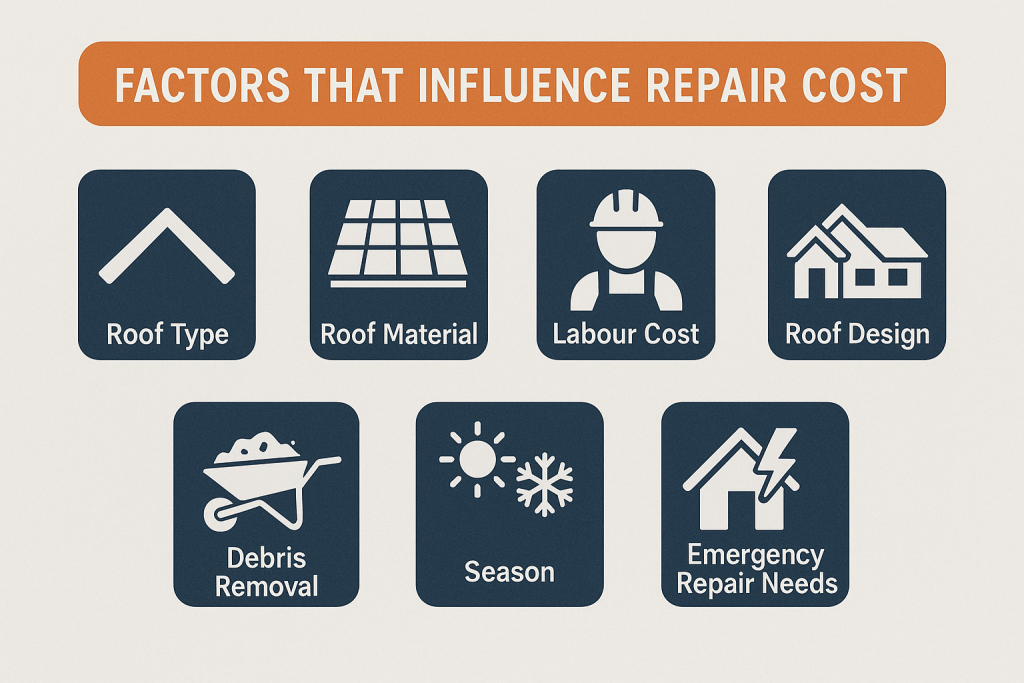
How Much Does it Cost to Repair a Roof Leak?
Roof leak repair cost can cost anywhere between $150 to $2,000, depending on the damage. Several factors influence the cost:
Factors That Influence Repair Cost:
- Roof Type
- Roof Material
- Labour Cost
- Roof Design
- Debris Removal
- Season
- Emergency Repair Needs
Roof Types
Roof leak repair cost varies based on slope and size. Each combination affects labor time, equipment, and material needs.
Based on Slope:
Low-slope
Easier to walk on, but may require extra sealing due to pooling water.
Steep Roofs
Harder to access and often need more safety measures, which raises labor costs.
Based on Size:
Roof leak repair cost depends greatly on roof size.
Small Roof
Repairs are usually fast and affordable with minimal materials.
Moderate Roof
Moderate-sized homes may have complex flashing or gutter systems, raising the effort.
Significant Roof
Large homes with multiple features increase the cost due to labor and equipment usage.
Roof Material
Different roofing materials carry different labor and product costs that can add up to total roof leak repair cost.
Asphalt Shingles
Affordable and widely used; easy to repair.
Metal
Durable but needs special tools and techniques.
Tile
Heavy and brittle; repairs require care and precision.
Slate
Expensive and time-consuming due to the material’s delicacy.
Wood Shakes
Look great, but are prone to water damage and need careful patching.
Single-ply Membranes
Common on flat roofs; require hot-air welding or adhesives.
Modified Bitumen
Two-ply system; needs torching or cold adhesives.
Built-up Roofing
Multiple layers make spot-repair tricky and labor-intensive.
Other Roof Leak Repair Cost Factors
Labour Cost
Ranges from $50 to $100 per hour based on your region and roof type.
Design
Chimneys, skylights, or dormers complicate repairs due to extra flashing and detailing.
Cost to Remove Excess Debris
Cleaning clogged gutters, leaves, or torn shingles adds to the roof repair cost.
Cost by Season
Repairs in peak season (spring and fall) often cost more due to high demand.
Emergency Roof Leak Repair
Urgent same-day services can raise prices by 1.5x to 2x standard rates.
7 Most Common Types of Roof Leak
Cracked or Worn Pipe Boots
These boots crack under sun exposure and become entry points for water.
Repairing Process:
- Remove old boot
- Inspect decking
- Install new boot with sealant
Deteriorated Metal Collars Around Vents
Water can creep in where caulk fails around metal collars.
Repairing Process:
- Scrape old sealant
- Re-caulk or replace collar
- Seal with flashing tape
Improperly Sealed Roof Valleys
Poor valley sealing causes water to pool and leak through.
Repairing Process:
- Remove valley shingles
- Reinstall underlayment
- Seal and reshingle properly
Chimney Flashing or Mortar Issues
Cracked mortar and flashing gaps are notorious leak spots.
Repairing Process:
- Remove loose flashing
- Rebuild mortar joint
- Apply new flashing and sealant
Faulty Skylight Installation or Seal Failure
Skylight flashing often fails due to weather or improper setup.
Repairing Process:
- Remove frame
- Replace flashing
- Reinstall and reseal skylight
Leaky Roof-to-Wall Transitions
This area needs step flashing; poor installation allows leaks.
Repairing Process:
- Remove siding and flashing
- Install new step flashing
- Reseal and finish wall line
Nail Pops Breaking Through Shingles
Nails backing out pierce shingles, creating water entry.
Repairing Process:
- Remove loose nails
- Install new shingles with correct nailing
Why Choose FRS for Roof Leaks?
We’re not here to sell you a new roof.
At FRS, we treat every leak like it’s our own home at risk.
Our certified inspectors offer honest guidance, fast repairs, and long-lasting solutions, not sales pressure.
Your peace of mind is our priority.
Contact us now.
This Post Don’t Get Overcharged: Know the True Roof Leak Repair Cost appeared first on this FRS Roofing + Gutters and is written by seo rank
via FRS Roofing + Gutters frsroof.com/know-the-true-r...